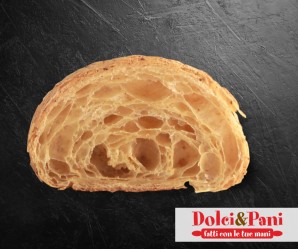
Croissant, il piacere della colazione

I croissant, chiamati spesso anche cornetti o impropriamente brioche, sono il classico dolce da colazione di molti tra noi.
Spesso ripieni di crema, cioccolata o marmellata ed accompagnati da un buon bicchiere di spremuta d'arancia, un caffè o un cappuccino sono il “comfort food” per eccellenza di moltissimi italiani: morbide delizie a forma di mezzaluna dalla superficie dorata e dalla consistenza soffice, fragrante e sfogliata, servite al bar e nelle pasticcerie di tutta Italia.
La leggenda narra che il croissant sia stato inventato a Vienna, in occasione della sconfitta dell'Impero Ottomano nel 1683… (sei interessato? continua a leggere qui)
VOGLIAMO PROVARE A FARLI?
Avendo un po’ di tempo a disposizione e animati dalla passione per l’arte dolciaria, non c’è ragione nel rinunciare a preparare dei golosi croissant casalinghi, senza doverli andare a gustare in una caffetteria dove spesso servono, scongelati e riscaldati, prodotti surgelati industriali.
Per prepararli servono pochi ingredienti classici: farina, lievito (di birra o naturale), burro, uova, sale, zucchero, latte e aromi (vaniglia, buccia di arancia e/o limone grattugiati). La farina da scegliere deve essere forte e se non la trovate è preferibile aggiungere della farina "manitoba" (vuoi saperne di più sulla farina... clicca qui), che ha un maggiore contenuto in glutine della farina normale e permette di ottenere migliori risultati. Un'alternativa più semplice per preparare l'impasto è quella di utilizzare il nostro Preparato per Croissant al Burro che già contiene il giusto tipo di farina, le uova, il burro ed il latte (questi ultimi tre, in polvere), infine lo zucchero insieme al sale ed agli aromi.
E’ anche importante sapere che i tempi di lavorazione sono abbastanza lunghi, tenendo conto della lavorazione, poi della lievitazione ed infine della cottura; in particolare la lavorazione ha un grado di difficoltà medio-alto, dovendo seguire una serie di determinati passaggi non del tutto semplici per chi è alle prime armi. Una volta fatto l'impasto, bisogna infatti stenderlo e laminarlo insieme al burro in più passaggi che comunque vedremo in seguito.
PREPARIAMO L'IMPASTO CON IL METODO TRADIZIONALE
Iniziamo la ricetta sciogliendo in mezzo bicchiere d’acqua tiepida il lievito di birra e lo zucchero, a cui poi si aggiunge il sale, le uova e la farina, e si inizia quindi ad impastare aggiungendo lentamente il latte (e/o l’acqua) necessario ed un po' di burro. Le dosi di una ricetta standard sono riportate in fondo alla pagina (ovviamente esistono molte varianti e ciascuno, si dice, ha il proprio segreto!).
Se impastate a mano, aiutatevi inizialmente con una spatola o un mestolo mescolando il tutto in una bacinella capiente. Una lavorazione ottimale richiederebbe l'uso di una planetaria domestica attrezzata con il "gancio".
Il risultato è quello di ottenere un impasto liscio, elastico e morbido che, appallottolato (arrotondato a "palla"), dovrà essere messo in una ciotola coperta da un telo di plastica o da un panno leggermente umido. Inizia così una prima lievitazione di circa 1-2 ore (a seconda della temperatura ambiente; infatti più alta è la temperatura, più veloce è la lievitazione e viceversa).
Eventuale lavorazione lunga aggiuntiva: togliere nuovamente l’impasto dalla ciotola, “sgonfiare” l’impasto, riporlo su un ripiano infarinato e stenderlo con le mani in un rettangolo di 20×30 cm circa. Ripiegate in tre il rettangolo, come se fosse una lettera, rimettetelo nella ciotola pulita, coprite e mettete a lievitare una seconda volta. In questo caso l’impasto dovrà lentamente raddoppiare di volume (almeno 2 ore ad una temperatura ambiente di 20-22°C).
Altra ottima soluzione: una volta fatto l'impasto e prima di ogni lievitazione, mettetelo in una ciotola, ricopritelo bene con un telo di plastica e riponetelo in frigorifero (4-6°C) per una notte, pronto per ripartire la mattina successiva.
LA SFOGLIATURA
Quando l'impasto sarà lievitato, si inizierà a lavorarlo con il mattarello ed il burro!
Ovviamente parliamo del burro che serve a sfogliare il croissant, non di quella piccola quantità che è già presente all'interno dell'impasto principale. Per questo scopo, il burro deve avere una certa malleabilità, quindi non può essere tolto dal frigo e lavorato subito, sarebbe troppo duro e si romperebbe in scaglie, deve invece essere tolto dal frigo per tempo ma non troppo, così da non essere eccessivamente molle. Un po' di pratica non guasta in tali casi per capire la consistenza giusta. Alternativa all'uso del burro è la margarina specifica per sfoglia (e croissant). È utilizzata a livello professionale ed è in vendita sul nostro sito. Se decidete di acquistare da altri, fate attenzione alla qualità, non deve contenere grassi idrogenati e deve essere prodotta con materie vegetali di prima scelta.
Per la sfogliatura, per prima cosa stendete con il mattarello l’impasto su un piano infarinato e aiutandovi con il palmo della mano dategli una forma rettangolare. A parte stendete sul tavolo il burro e fatene pure un rettangolo, un po' più piccolo dell'altro, posatelo sull’impasto steso e richiudetelo all'interno con i bordi dell'impasto.

Richiudete il burro all’interno del pastello e cominciate a dare le cosiddette pieghe (è così anche per la pasta sfoglia, vedi qui). Per una sfogliatura classica date 2 pieghe semplici a 3.
Una "piega a 3" si realizza così: si inizia a stendere l'impasto (con dentro il burro) sempre dallo stesso lato così da allungarlo ed in pari tempo appiattirlo. Quando è steso ad uno spessore di circa 1,5-2 cm, si prende un bordo (dal lato corto) e lo si ripiega su sé stesso per un terzo della lunghezza della pasta stessa. Quindi si prende l’altro bordo del lato corto e lo si ripiega ricoprendo il tutto. Questa è la cosiddetta piega semplice od anche “piega a 3”.

Data la prima "piega a 3", si avvolge il tutto in un telo di plastica o di pellicola e lo si lascia a riposare in frigorifero per circa 2 ore, in modo che l'impasto del croissant si rilassi bene. Poi lo si tira fuori dal frigo e si da un'altra "piega a 3" (attenzione a girare l'impasto di 90° e stenderlo dal lato "aperto"). Lo si stende ancora fino ad uno spessore di circa 1,5-2 cm e lo si rimette nuovamente avvolto con un telo in frigorifero per un'altra ora o due.
Una precisazione: dare 2 "pieghe a 3" è il sistema classico, ma c'è anche chi sfoglia il croissant prima con una "piega a 3" (piega semplice) e poi con una "piega a 4" (piega doppia). C'è anche chi stende l'impasto con 2 pieghe doppie (in tal caso la sfogliatura finale del croissant sarà più fitta).
I TRIANGOLI
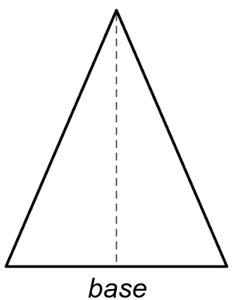
Alla fine del secondo riposo in frigo, arriva il momento di dare forma ai croissant. Per farlo servono manualità, un minimo di precisione ed un coltello affilato.
Si dovrà stendere ancora una volta l’impasto con il mattarello fino ad uno spessore di circa 6-8 mm. Quindi si taglia l'impasto, incidendolo con il coltello, formando dei triangoli un po' allungati (per chi ama la matematica si tratta di un triangolo isoscele!) della grandezza desiderata e poi uno ad uno si allungano leggermente.
Con la punta davanti, si arrotola la base del triangolo su sé stesso fino alla punta, si prende poi il croissant, lo si poggia su una teglia rivestita di carta da forno, con la punta rivolta sotto il croissant, e con delicatezza si curvano leggermente le due estremità dei croissant, dandogli la tipica forma a mezzaluna.
N.B. I croissant che non volete cuocere subito, potete metterli in congelatore e tirarli fuori al bisogno ma non oltre una settimana circa, pena una successiva cattiva lievitazione.
ULTIMI ACCORGIMENTI
Riposti tutti i croissant sulla teglia in modo che non si tocchino, copriteli con un telo di plastica e lasciateli lievitare in una stanza possibilmente riscaldata, almeno fino a raddoppiare il volume. A fine lievitazione i croissant, per essere pronti alla cottura, dovrebbero essere elastici e leggeri al delicato tatto dei polpastrelli delle dita.
Prima di cuocerli, spennellate piano la superficie con tuorlo d’uovo, sbattuto a parte, ed infornate a 200°C per circa 15-20 minuti.
Infine ... buona colazione!
LA RICETTA
Riportiamo ora la ricetta di un croissant a lavorazione tradizionale a confronto con la ricetta del nostro Preparato per Croissant al burro:
|
Ricetta impasto tradizionale FARINA g 1.000 LIEVITO g 25-30 ZUCCHERO g 120-150 UOVA g 150-200 ACQUA e/o LATTE g 400-450 AROMA vaniglia o bacca di vaniglia Q.B. BUCCIA di arancio e/o limone grattugiato Q.B. BURRO g 50-100 |
Ricetta impasto con preparato PREPARATO g 1.000 LIEVITO g 30 ACQUA g circa 480-500 |
|
Per la sfogliatura BURRO (o MARGARINA PER CROISSANT/SFOGLIA) g 400-500 |
Per la sfogliatura BURRO (o MARGARINA PER CROISSANT/SFOGLIA) g 250-300 |
Il nostro Preparato per Croissant al Burro, come si vede, ha una ricetta molto più semplice, ma ha pure altri vantaggi. Se sei interessato clicca qui per visualizzare la scheda del prodotto.